Sugar Cookie Icing – Simple, Shiny, and Perfect for Decorating
Sugar cookie icing shouldn’t be complicated. You want something that mixes quickly, spreads smoothly, and dries shiny without tasting like chalk. This recipe delivers all that with pantry staples and a few helpful tips.
Whether you’re decorating holiday cookies or a last-minute batch for a birthday, this icing is reliable, easy to color, and dries to a beautiful finish. You can make it thick for outlining and thin for flooding, all from the same base.
What Makes This Recipe So Good
- Foolproof consistency: One base icing can be easily adjusted for outlining or flooding with a little extra liquid.
- No fancy ingredients: It uses powdered sugar, milk or water, and light corn syrup for shine and smoothness.
- Quick drying: It sets in a few hours and firms up enough to stack gently by the next day.
- Great taste: A touch of vanilla or almond extract gives it a warm, classic bakery flavor.
- Vibrant colors: Gel food coloring blends smoothly without watering it down.
What You’ll Need
- 2 cups powdered sugar (also called confectioners’ sugar)
- 2–3 tablespoons milk or water (milk adds creaminess; water keeps it bright white)
- 1–2 tablespoons light corn syrup (for shine and a smooth finish)
- 1/2 teaspoon vanilla extract (or almond extract for a bakery-style flavor)
- Pinch of salt (balances sweetness)
- Gel food coloring (optional, for tinting)
- Sprinkles or sanding sugar (optional, for decorating)
Step-by-Step Instructions

- Whisk the base: In a medium bowl, whisk powdered sugar, 2 tablespoons milk or water, 1 tablespoon corn syrup, vanilla, and a pinch of salt until smooth. It should be thick but stirrable.
- Adjust consistency: For outlining, aim for toothpaste-thick icing that holds its shape.
Add powdered sugar to thicken or a few drops of liquid to loosen. For flooding, add liquid 1/4 teaspoon at a time until it flows like honey and smooths out in about 10–12 seconds.
- Color it: Divide icing into bowls and add gel food coloring sparingly. Stir well.
Gel is strong, so start small and build up gradually.
- Prepare your tools: Transfer icing to piping bags or squeeze bottles. Use a small round tip (like #2 or #3) for outlines and details. For flooding, cut a small hole in the bag or use a bottle with a wider tip.
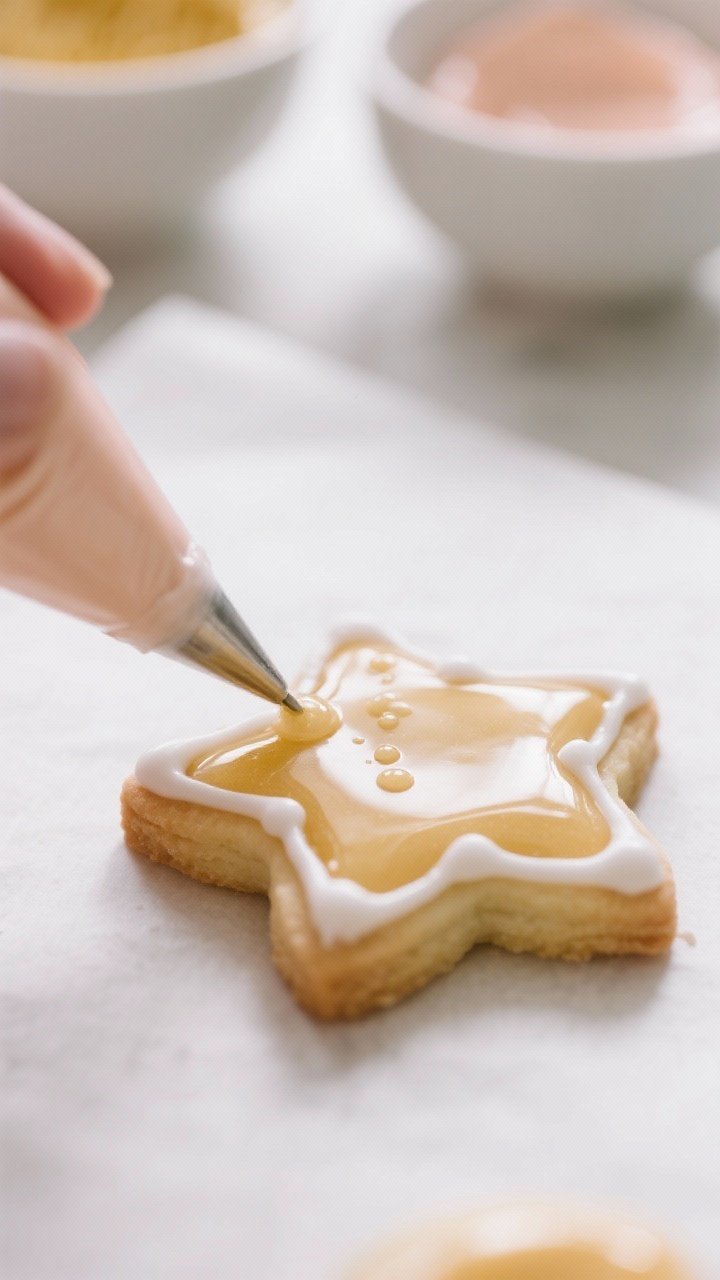
- Outline first: Pipe a thin outline around the edge of each cookie to create a barrier.
Let it sit for 2–3 minutes to set slightly.
- Flood the cookie: Fill the outlined area with your thinner icing. Use a toothpick or scribe tool to nudge icing into corners and pop air bubbles.
- Add details: For layered designs, let the base dry 20–30 minutes before adding lines, dots, or patterns. For crisp, raised details, wait 2–3 hours.
- Dry time: Let cookies dry at room temperature until the surface is fully set, usually 6–8 hours or overnight.
Avoid humidity if possible.
- Finish with sprinkles: If using sprinkles, add them right after flooding while the icing is still wet.
Keeping It Fresh
- Short-term storage: Cover bowls with plastic wrap pressed directly onto the surface to prevent crusting. The icing can sit at room temperature for a few hours while you decorate.
- Refrigeration: Store leftover icing in airtight containers for up to 1 week. Stir well before using; add a tiny splash of liquid if it thickens.
- Freezing: You can freeze the icing for up to 2 months.
Thaw in the fridge overnight, then bring to room temperature and whisk smooth.
- Storing decorated cookies: Once fully dry, place cookies in layers with parchment between them. Keep at room temperature for 3–5 days in an airtight container.
Health Benefits
- Portion control: Since this icing is sweet and flavorful, a thin layer goes a long way. You can use less icing without feeling deprived.
- Customizable ingredients: You decide what goes in—use milk alternatives, reduce corn syrup, or choose natural food coloring if you prefer.
- No raw egg whites: Unlike some royal icings, this version avoids raw eggs, which some people prefer for safety and simplicity.
- Allergen aware: It’s easy to make this icing dairy-free, nut-free, and gluten-free with simple swaps.
Pitfalls to Watch Out For
- Too much liquid: Over-thinning leads to runny icing that won’t set properly.
Add liquid in tiny amounts and test the flow.
- Skipping corn syrup: You can omit it, but the icing may lose some shine and smoothness. If you skip it, be extra careful with consistency.
- Humidity issues: Moist air slows drying and can cause cloudiness or bleeding colors. Let cookies dry in a cool, dry area and avoid covering too soon.
- Overmixing colors: A heavy hand with gel colors can create a bitter aftertaste.
Build up slowly and let colors deepen as they sit.
- Not letting layers set: Adding details too soon can cause sinking or color bleed. Give the base time to firm up.
Alternatives
- Dairy-free: Use water or an unsweetened non-dairy milk like almond or oat milk. The icing will still set beautifully.
- No corn syrup: Replace with honey or maple syrup for a different flavor, or omit and use water/milk only.
The finish will be less glossy.
- Citrus twist: Swap vanilla for lemon juice and zest for a bright, fresh flavor that pairs well with buttery cookies.
- Almond bakery style: Use almond extract for a nostalgic bakery taste. Start with 1/4 teaspoon and adjust to taste.
- Naturally colored: Try beet powder (pink), matcha (green), turmeric (yellow), or cocoa powder (brown). Add a touch more liquid if powders thicken the icing.
- Royal icing alternative: If you need ultra-crisp details and a harder set, make royal icing with meringue powder.
It’s different in texture but great for intricate work.
FAQ
How long does sugar cookie icing take to dry?
Most cookies are surface-dry in 2–4 hours and fully set in 6–8 hours. For stacking or packaging, let them rest overnight in a dry room.
Can I make this icing without corn syrup?
Yes. It will still taste great but may dry with a softer sheen and slightly less smoothness.
Adjust consistency carefully and allow extra drying time.
What’s the best way to color the icing?
Use gel food coloring. It gives vibrant color without thinning the icing. Add a little at a time and let the color develop for a few minutes before adjusting.
Why is my icing dull or cloudy?
Humidity, over-thinning, or skipping corn syrup can cause a matte finish.
Dry cookies in a cool, dry place and keep your icing on the thicker side for a glossy look.
How do I prevent color bleeding between sections?
Let the first layer set 20–30 minutes before adding another color next to it. Avoid overflooding and keep your workspace cool and dry.
Can I use this icing for gingerbread houses?
It works for decoration, but it’s not as strong as royal icing for structural support. Use royal icing for building and this icing for decorative details.
What if my icing crusts over in the bowl?
Press plastic wrap directly on the surface between uses.
If a crust forms, stir well; add a drop or two of liquid to smooth it out.
How do I get perfectly smooth cookies?
Outline, flood promptly, and use a toothpick to pop air bubbles. Gently shake the cookie to level the icing and avoid drafts while drying.
Is this icing safe for kids with allergies?
It’s naturally egg-free and can be dairy-free if you use water or non-dairy milk. Always check labels on food colors and extracts for potential allergens.
Can I add butter to make it richer?
Butter will change the texture and prevent a clean, glossy set.
If you want richer flavor, stick to extracts or a splash of cream instead of butter.
Wrapping Up
This sugar cookie icing is simple, adaptable, and dependable. With a few pantry staples and a minute or two of mixing, you’ll have a smooth, glossy icing that’s easy to color and dries beautifully. Keep an eye on consistency, give layers time to set, and let the cookies dry fully before storing.
Once you’ve nailed those basics, decorating becomes fun, not fussy—and your cookies will look as good as they taste.