Colorful Christmas Pinwheel Cookies Everyone Will Love
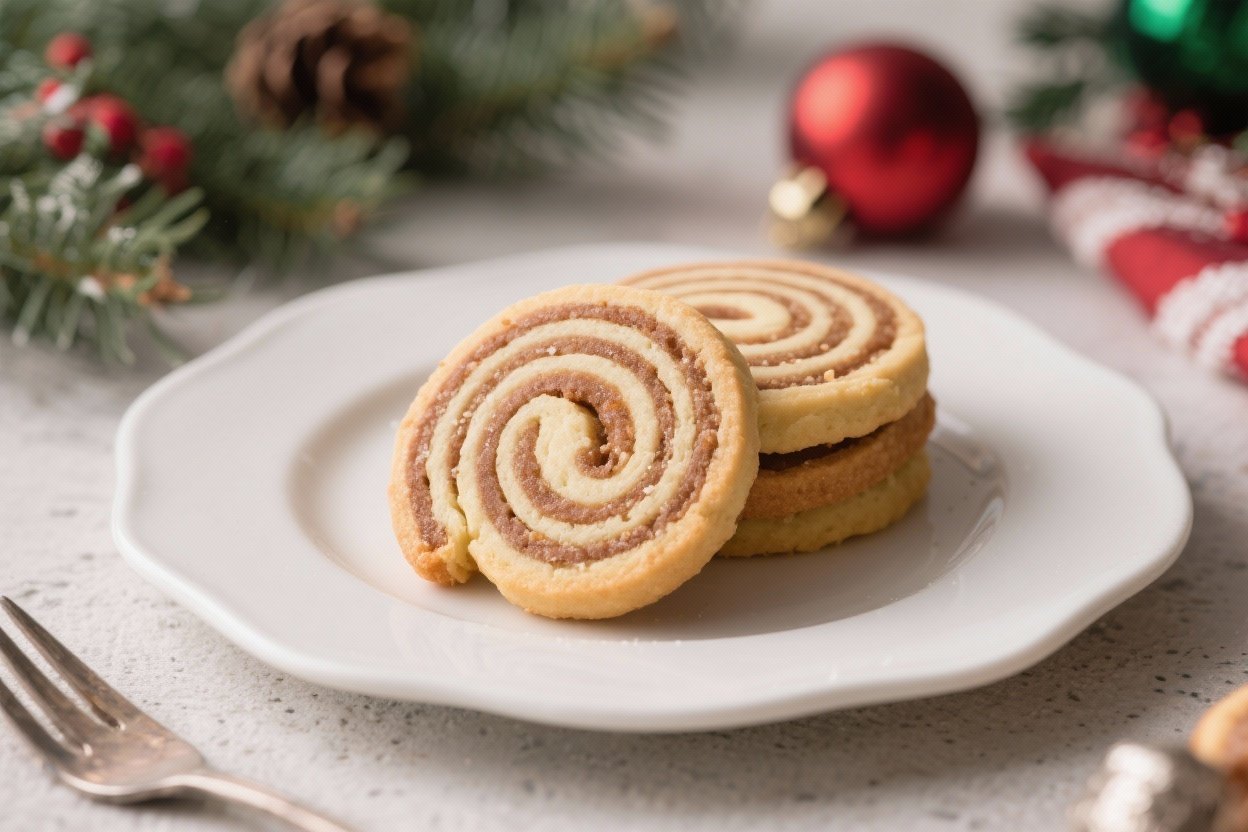
These cookies look like they came straight from a holiday bakery, but they’re surprisingly easy to make at home. A buttery vanilla dough gets split, colored, and rolled into cheerful spirals. Slice, bake, and you’ve got picture-perfect cookies that taste as good as they look.
They’re a hit with kids, great for gifting, and a fun weekend bake if you like a little craftiness in the kitchen. Serve them with hot cocoa, tuck them into tins, and watch them disappear.
What Makes This Special
Pinwheel cookies deliver that classic sugar cookie flavor with a playful holiday twist. The swirl comes from layering two doughs, one natural and one tinted red or green, then rolling them into a log.
It’s simple, but the result feels festive and polished. You can customize the colors, add sprinkles to the edges, or switch up the flavors for your crowd. Best of all, the dough is make-ahead friendly, so you can bake fresh cookies right before guests arrive.
Shopping List
- All-purpose flour – 3 cups (plus a little for dusting)
- Unsalted butter – 1 cup (2 sticks), softened
- Granulated sugar – 1 cup
- Eggs – 2 large
- Vanilla extract – 2 teaspoons
- Almond extract – 1/2 teaspoon (optional but lovely)
- Baking powder – 1 teaspoon
- Fine salt – 1/2 teaspoon
- Gel food coloring – red and/or green
- Sprinkles or sanding sugar – optional, for rolling the edges
- Milk – 1–2 teaspoons (only if dough needs softening)
- Parchment paper – for rolling and baking
How to Make It
- Cream the butter and sugar. In a large bowl, beat softened butter and sugar together until light and fluffy, about 2–3 minutes.
This sets you up for tender cookies.
- Add eggs and extracts. Mix in the eggs one at a time, then add vanilla and almond extract. Scrape the bowl so everything blends evenly.
- Combine dry ingredients. In a separate bowl, whisk flour, baking powder, and salt. Add to the butter mixture in two additions, mixing just until combined.
If the dough seems crumbly, add up to 2 teaspoons milk to help it come together.
- Divide and color the dough. Split the dough into two equal portions. Leave one plain. Tint the other with gel food coloring (red or green) until evenly colored.
Gel works best because it doesn’t water down the dough.
- Chill briefly for easy rolling. Flatten both doughs into rectangles about 1 inch thick. Wrap and chill for 20–30 minutes. You want the dough firm but still pliable.
- Roll each dough. On lightly floured parchment, roll the plain dough into a 9×13-inch rectangle.
Roll the colored dough to the same size. Trim the edges so both rectangles match—clean edges help create a tidy swirl.
- Stack and roll into a log. Carefully place the colored dough on top of the plain dough (or vice versa). Gently press to remove any air pockets.
Starting from a long edge, use the parchment to help you roll the layers into a tight log. Don’t rush—tight rolling makes a defined swirl.
- Optional sprinkle edge. If using, brush the outside of the log very lightly with water and roll it in sprinkles or sanding sugar for a festive border.
- Chill until firm. Wrap the log in parchment or plastic wrap and chill for at least 2 hours, or freeze for 30–40 minutes. Firm dough slices cleanly and holds its shape.
- Preheat and prep. Heat oven to 350°F (175°C). Line two baking sheets with parchment.
- Slice the cookies. Using a sharp knife, slice 1/4-inch rounds.
If the log flattens as you cut, rotate it every few slices. Place cookies 2 inches apart on the sheets.
- Bake. Bake 9–11 minutes, until the edges are set and the tops look matte but not browned. Do not overbake—these should stay pale for a tender bite.
- Cool. Let cookies rest on the sheet for 5 minutes, then transfer to a rack to cool completely. They’ll firm up as they cool.
Storage Instructions
- Room temperature: Store in an airtight container for 5–6 days.
Add a slice of bread to keep them soft.
- Freezer (baked): Freeze cooled cookies up to 2 months. Thaw at room temperature.
- Freezer (dough): Freeze the wrapped log up to 2 months. Let it sit at room temp 10–15 minutes before slicing so it doesn’t crack.
- Gifting: Layer cookies between parchment in tins to prevent smudging and breakage.
Benefits of This Recipe
- Show-stopping look with simple steps. You get bakery-level results without fussy decorations.
- Make-ahead friendly. The dough chills well, and the log can be frozen for later.
- Customizable. Colors, flavors, and edges are easy to swap to match any theme.
- Kid-approved activity. Rolling, slicing, and sprinkling are fun tasks for little helpers.
Pitfalls to Watch Out For
- Overmixing the dough. This can toughen the cookies.
Mix just until combined.
- Warm dough when rolling. If the dough is too soft, it sticks and tears. Chill briefly and flour your parchment lightly.
- Loose spiral. A sloppy roll leads to gaps. Roll tightly and press gently to keep layers together.
- Overbaking. You want pale edges.
If they brown, the cookies get dry and crumbly.
- Using liquid food coloring. It can water down the dough. Gel coloring is best for vibrant hues.
Recipe Variations
- Peppermint swirl: Swap almond extract for 1/2 teaspoon peppermint extract. Sprinkle crushed candy canes on the edges.
- Chocolate twist: Replace 1/4 cup flour with cocoa powder in one half of the dough for a chocolate-and-vanilla spiral.
- Red and green double: Divide into three parts: one plain, one red, one green.
Stack and roll for a tri-color pinwheel.
- Confetti edges: Roll the log in rainbow nonpareils for a fun, party-ready look.
- Spiced holiday: Add 1 teaspoon ground cinnamon and a pinch of nutmeg to the plain dough for a warm spice note.
- Citrus bright: Add 1 tablespoon orange zest to the dough and a touch of orange extract for a cozy, fragrant twist.
FAQ
Can I make the dough a day or two ahead?
Yes. Keep the wrapped dough log in the fridge for up to 48 hours, or freeze it for up to 2 months. If chilled longer than a day, let it sit 10–15 minutes before slicing so it doesn’t crack.
What if my dough cracks when rolling?
It’s probably too cold.
Let it warm slightly, then press cracks together with clean fingers. A very light mist of water on the surface can help the layers adhere.
Do I need a stand mixer?
No. A hand mixer works fine.
If mixing by hand, make sure the butter is very soft and cream well with the sugar to get a light texture.
Can I use natural food coloring?
Yes, but colors may be softer. Choose concentrated natural gels if possible. You can also lean into a pastel holiday palette—it still looks charming.
How thick should I slice the cookies?
About 1/4 inch.
Thinner slices can brown too quickly, and thicker ones may bake unevenly or lose their swirl definition.
Why are my cookies spreading?
The dough may be too warm or not enough flour was used. Chill the sliced cookies on the sheet for 10 minutes before baking, and make sure you measured the flour correctly.
Can I halve or double the recipe?
Absolutely. Halve for a small batch or double for gifting.
If doubling, divide the dough into two logs for easier rolling and even chilling.
How do I get really sharp swirls?
Trim the rolled sheets so they match perfectly, roll tightly using the parchment for support, and chill the log until very firm. Use a sharp, thin knife and wipe it between cuts.
In Conclusion
Swirled Christmas Pinwheel Cookies bring big holiday cheer with straightforward steps and simple ingredients. They look festive, taste buttery and vanilla-rich, and hold up great for parties and gift boxes.
With a little chilling time and a steady roll, you’ll have crisp, clean spirals every time. Bake a batch, share the tin, and let the cookies steal the show.
Swirled Christmas Pinwheel Cookies
Ingredients
Method
- Cream butter and sugar in a bowl until soft and fluffy. Mix in the egg and vanilla until smooth.
- In another bowl whisk flour, baking powder, and salt. Add dry mix into the wet mix and combine until a soft dough forms.
- Divide the dough into two equal portions. Tint one portion red and the other green with gel food coloring until vibrant.
- Roll each dough between parchment sheets into rectangles of the same size. Chill twenty to thirty minutes until slightly firm.
- Place one dough rectangle on top of the other. Gently press to help them stick. Roll tightly into a log starting from the long side.
- Wrap the log in plastic wrap and chill at least two hours. This helps the cookies keep their swirled shape.
- Slice the chilled log into even rounds and place on a baking sheet lined with parchment.
- Bake at 350 degrees Fahrenheit for ten to twelve minutes or until set with soft edges. Cool on a rack.
Notes
Use gel colors for bold tones
Roll both doughs to the same thickness for perfect spirals
Use a serrated knife for clean slices Storage Store in an airtight container for up to one week
Freeze unbaked cookie logs for up to two months
Freeze baked cookies for up to three months Variations Try red and white for a candy cane look
Add peppermint extract for a seasonal twist
Roll edges in sanding sugar before baking
Use pastel colors for non-holiday celebrations Serving Ideas Wrap in cellophane for holiday gifts
Add to Christmas cookie platters
Serve with hot cocoa or festive coffee drinks
Printable Recipe Card
Want just the essential recipe details without scrolling through the article? Get our printable recipe card with just the ingredients and instructions.