How to Make the Best Mocha Icebox Cake
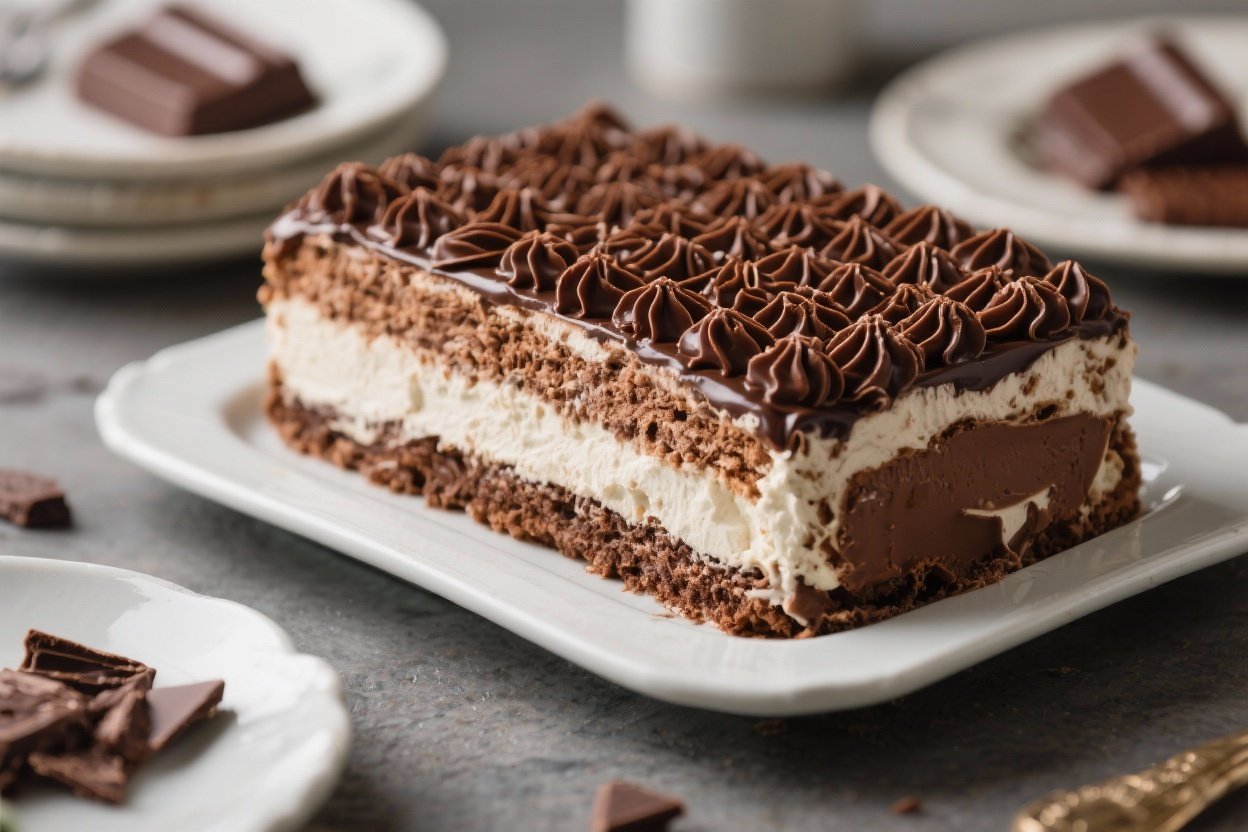
If you love the mix of chocolate and coffee, this dessert will make you very happy. A mocha chocolate icebox cake is creamy, rich, and surprisingly easy to put together. No oven, no stress—just layers of cookies and whipped cream that transform in the fridge.
It’s great for gatherings, holidays, or any time you want something special without fuss. The best part? It looks impressive, but anyone can make it.
What Makes This Special
This cake delivers that classic icebox magic: simple ingredients that turn into something elegant.
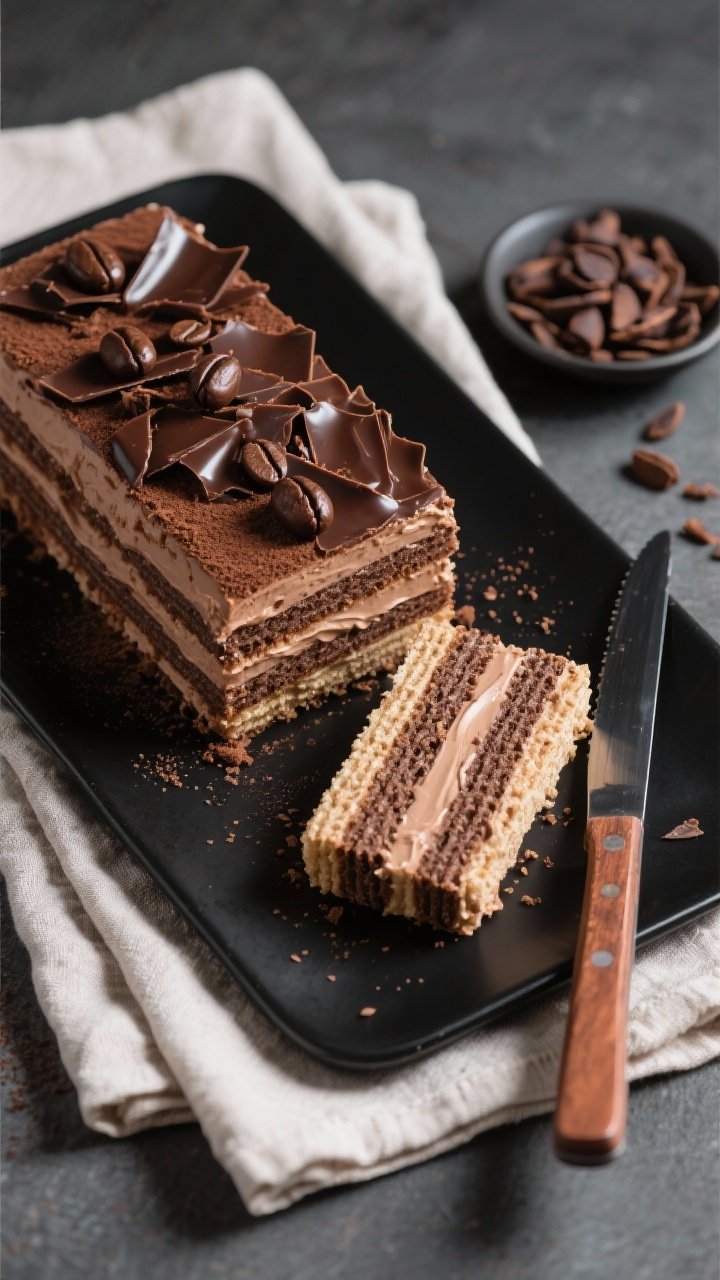
The combination of bittersweet chocolate and bold coffee balances the sweetness, so it tastes grown-up without losing the fun. You can build it in a loaf pan for neat slices or a springform pan for a round, cake-like look. It slices beautifully once chilled, showing off lovely layers.
And because it’s no-bake, it’s perfect for warm days or busy schedules.
Shopping List
- Chocolate wafer cookies or thin chocolate cookies (about 12–14 ounces)
- Heavy whipping cream (4 cups)
- Mascarpone cheese or cream cheese, softened (8 ounces)
- Granulated sugar (1/3 cup) or powdered sugar (1/2 cup)
- Unsweetened cocoa powder (3 tablespoons)
- Espresso powder or instant coffee (2–3 teaspoons, to taste)
- Vanilla extract (2 teaspoons)
- Dark chocolate, finely chopped or shaved (2–3 ounces)
- Milk or brewed coffee, cooled (2–3 tablespoons, optional for softening cookies)
- Pinch of salt
- Optional toppings: cacao nibs, chocolate-covered espresso beans, cocoa dusting
Step-by-Step Instructions
- Chill your tools. Place a large mixing bowl and beaters in the fridge for 10–15 minutes. Cold tools help cream whip faster and hold its shape.
- Mix the mocha base. In the cold bowl, add mascarpone (or cream cheese), sugar, cocoa powder, espresso powder, vanilla, and a pinch of salt. Beat on medium until smooth and creamy.
- Whip the cream. Pour in the heavy cream and beat on medium-high until you get firm, billowy peaks.Don’t overbeat—stop once it holds ridges that don’t collapse.
- Taste and adjust. If you want a stronger coffee kick, sift in another 1/2 teaspoon espresso powder and whip briefly to combine. If it’s too strong, add a splash of cream and mix gently.
- Prepare your pan. Line a 9×5-inch loaf pan with plastic wrap, letting it overhang for easy removal. Or use a 9-inch springform pan and leave it unlined.
- Optional cookie dip. For a softer texture, briefly dip each cookie in milk or cooled coffee—just one quick dunk.This helps them meld faster in the fridge.
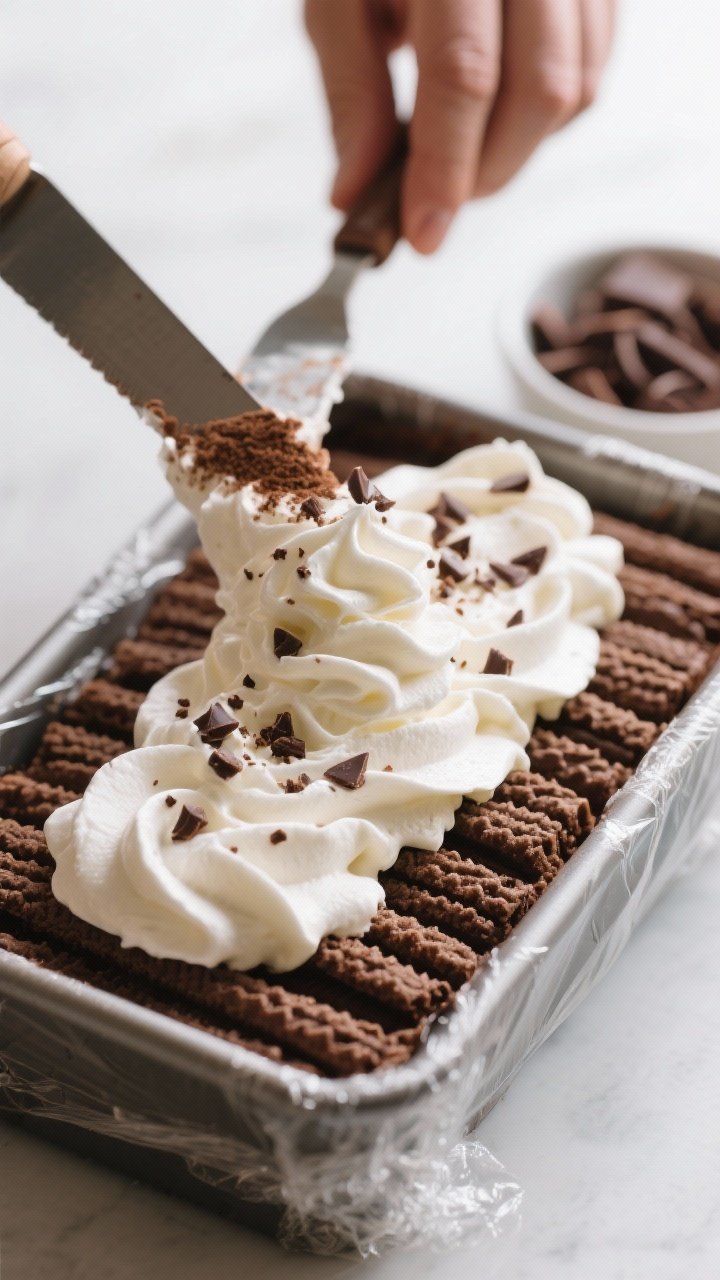
- Start layering. Spread a thin layer of the mocha cream on the bottom. Add a single layer of cookies, breaking a few to fill gaps. Top with a generous layer of cream, then a sprinkle of chopped dark chocolate.
- Repeat. Continue layering cookies, cream, and chocolate until you reach the top, finishing with a layer of cream.You should have 5–7 layers of cookies, depending on your pan.
- Smooth and decorate. Use an offset spatula to smooth the top. Add shaved chocolate, a dusting of cocoa, or a few espresso beans for a polished look.
- Chill to set. Cover and refrigerate for at least 6 hours, preferably overnight. The cookies soften and become cake-like, and the flavors meld.
- Unmold and slice. For a loaf pan, lift using the overhanging wrap and peel it away.For a springform, release the ring and run a warm knife around the edge. Slice with a knife dipped in hot water and wiped dry.
- Serve. Serve cold, with an extra sprinkle of cocoa or chocolate shavings. A small slice goes a long way—this cake is rich and satisfying.
How to Store
- Refrigerate: Keep covered and chilled for up to 3–4 days.The texture stays best in the first 48 hours.
- Freeze: Wrap tightly and freeze for up to 1 month. Thaw in the fridge for several hours before serving. It also tastes great slightly frozen.
- Avoid the freezer for long-term storage if using a high-water cookie (like graham crackers), since ice crystals can affect the texture.
Health Benefits
This dessert is indulgent, but a few ingredients bring some perks.
Cocoa contains flavanols, which are linked to heart health and improved mood. Coffee and espresso offer antioxidants and a small energy boost. Mascarpone or cream cheese adds protein and calcium, though they also add saturated fat.
If you want to lighten it up, see the variations below for easy swaps that cut sugar and fat without sacrificing flavor.
Common Mistakes to Avoid
- Overwhipping the cream: This can turn the mixture grainy. Stop as soon as you see firm peaks.
- Skipping the chill time: The cake needs several hours to set and for the cookies to soften. Rushing leads to crunchy, uneven layers.
- Using thick, hard cookies: Thin chocolate wafers work best.If your cookies are thicker, dip them briefly so they soften properly.
- Too much liquid dip: A quick dunk is enough. Soaking the cookies can make the cake soggy.
- Uneven layers: Press gently as you layer to keep the cake even and stable. Smooth the cream to the edges so every bite has balance.
Variations You Can Try
- Lightened version: Use half heavy cream and half Greek yogurt (thick, full-fat) for a tangy twist.Sweeten slightly more to balance the tang.
- Almond mocha: Add 1/2 teaspoon almond extract and sprinkle toasted sliced almonds between layers.
- Salted caramel mocha: Drizzle a thin ribbon of caramel over each cream layer and finish with a pinch of flaky sea salt.
- No-caffeine: Swap espresso powder for decaf or use a coffee-flavored extract.
- Gluten-free: Use gluten-free chocolate cookies or biscuits. The rest of the recipe stays the same.
- Vegan: Use coconut cream or a plant-based whipping cream, vegan cream cheese, and dairy-free cookies. Sweeten with powdered sugar and add espresso powder as usual.
- Double chocolate: Fold 1/2 cup mini chocolate chips into the cream for extra texture.
- Orange mocha: Add 1 teaspoon orange zest to the cream and garnish with candied orange peel.
FAQ
Can I make this a day ahead?
Yes.
This cake actually improves with time. Make it the day before and chill overnight for the best texture and flavor.
What cookies work best if I can’t find chocolate wafers?
Thin chocolate cookies, chocolate graham crackers, or even Oreos with the cream removed can work. The key is a slim, crisp cookie that softens easily.
How strong is the coffee flavor?
It’s noticeable but balanced.
Use 2 teaspoons of espresso powder for mild coffee notes or 3 teaspoons for a bolder mocha taste.
Can I skip the mascarpone or cream cheese?
Yes, but the cream will be softer. If you skip it, add 1–2 tablespoons of powdered milk or use a stabilizer like instant pudding mix to help the whipped cream hold.
How do I get clean slices?
Chill the cake thoroughly, then use a long, sharp knife warmed in hot water and wiped dry between slices. Gentle sawing motions keep the layers intact.
Is it safe to leave out at a party?
Keep it chilled as much as possible.
It can sit at room temperature for about 1–1.5 hours, depending on the heat, before it starts to soften too much.
Can I reduce the sugar?
Absolutely. This cake is flexible. Reduce the sugar by a couple of tablespoons and add a touch more vanilla or a pinch of salt to keep the flavors balanced.
In Conclusion
Mocha chocolate icebox cake is the kind of dessert that feels luxurious without exhausting you.
A few smart layers, a good chill, and you’ve got a sliceable showpiece with bold coffee, deep chocolate, and silky cream. It’s adaptable, make-ahead friendly, and always a crowd-pleaser. Keep a batch of cookies and espresso powder on hand, and you can whip this up whenever the craving hits.
Printable Recipe Card
Want just the essential recipe details without scrolling through the article? Get our printable recipe card with just the ingredients and instructions.