The Ultimate Guide to Creating Original Fantasy Fudge

The best holiday treats are the ones that make people stop talking and start smiling. Original Fantasy Fudge is exactly that kind of dessert—silky, chocolatey, and perfect for sharing. It’s simple enough for beginners but beloved by seasoned bakers.
Whether you’re gifting it, serving it at a party, or sneaking a square for yourself, this classic recipe delivers. No fancy tools, no drama—just old-school fudge that turns out great every time.
What Makes This Special
Original Fantasy Fudge has a smooth, melt-in-your-mouth texture that’s hard to resist. Unlike old-fashioned fudge that relies on long boiling and precise temperatures, this version uses marshmallow creme to keep things creamy and consistent.
It sets up beautifully without graininess, and it slices cleanly into neat squares. It’s also easy to customize—add nuts, swap the chocolate, or mix in flavors to make it your own.
Ingredients
- 3 cups granulated sugar
- 3/4 cup unsalted butter (1 1/2 sticks)
- 2/3 cup evaporated milk (not sweetened condensed)
- 12 ounces semisweet chocolate chips
- 1 jar (7 ounces) marshmallow creme
- 1 teaspoon vanilla extract
- 1 cup chopped walnuts (optional but classic)
- Pinch of salt (optional, enhances flavor)
Step-by-Step Instructions
- Prep the pan: Line a 9×13-inch baking pan with parchment paper or foil, leaving a little overhang for easy lifting. Lightly butter the lining so the fudge releases cleanly.
- Measure everything first: Have your chocolate chips, marshmallow creme, vanilla, and nuts ready to go.Once the sugar mixture is hot, you’ll need to work quickly.
- Start the base: In a heavy-bottomed saucepan, combine the sugar, butter, and evaporated milk. Place over medium heat and stir gently until the butter melts and everything looks smooth.
- Bring to a boil: Increase heat to medium-high and bring the mixture to a full rolling boil. Stir constantly.Set a timer for 4–5 minutes from the moment it starts boiling.
- Cook to the right stage: Keep the mixture bubbling briskly while you stir non-stop. You’re aiming for about 234–236°F if using a candy thermometer. If you don’t have one, stick to the 4–5 minute timing and watch for a thicker, glossy texture.
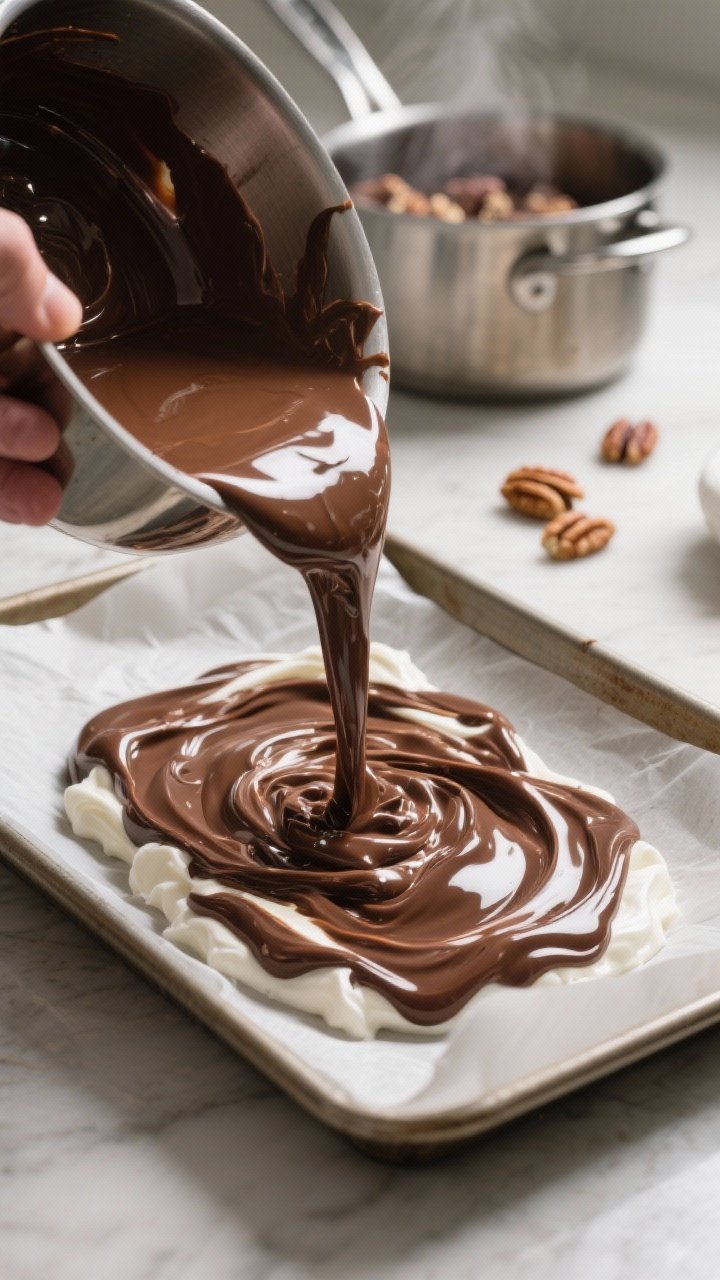
- Remove from heat: Take the pan off the burner.Immediately stir in the chocolate chips until completely melted and smooth.
- Add the marshmallow creme: Scoop in the marshmallow creme and stir until fully incorporated. The mixture should look thick, shiny, and uniform.
- Flavor and finish: Stir in the vanilla and a pinch of salt. Fold in the walnuts if using.Mix just until everything is evenly distributed.
- Pour and smooth: Scrape the fudge into the prepared pan. Use a spatula to smooth the top. Tap the pan lightly on the counter to release any air bubbles.
- Let it set: Allow the fudge to cool at room temperature for 3–4 hours, or until firm.For faster setting, you can refrigerate it, but room temp gives the best texture.
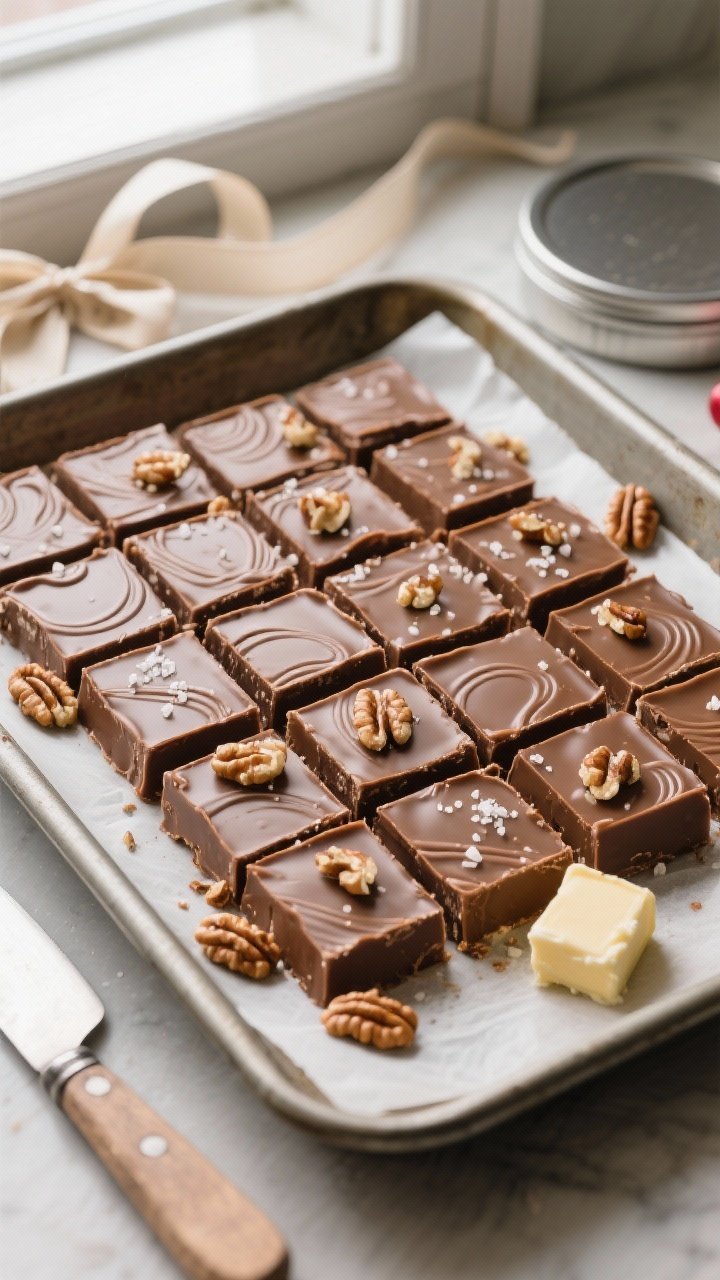
- Slice and serve: Lift the fudge out using the parchment overhang. Cut into small squares with a sharp knife. Wipe the blade between cuts for clean edges.
Storage Instructions
- Room temperature: Store in an airtight container for up to 1 week.Keep layers separated with parchment to prevent sticking.
- Refrigerator: Lasts up to 2 weeks in a sealed container. Let it sit at room temperature for 15–20 minutes before serving for the best texture.
- Freezer: Wrap tightly in plastic and then foil, or store in a freezer-safe container for up to 2 months. Thaw in the fridge overnight, then bring to room temperature.
Benefits of This Recipe
- Consistently creamy: Marshmallow creme helps prevent crystallization, so you get smooth fudge without guesswork.
- Beginner-friendly: No complicated stages or special equipment required—just careful timing and stirring.
- Customizable: You can swap flavors, add mix-ins, or adjust sweetness to your taste.
- Feeds a crowd: A 9×13 pan makes plenty for parties, gifts, or cookie trays.
- Make-ahead friendly: Keeps well and actually improves slightly after a day as flavors settle.
What Not to Do
- Don’t use sweetened condensed milk: It’s too sweet and thick; you need evaporated milk for the right texture.
- Don’t stop stirring while boiling: The sugar can scorch quickly.Keep it moving for even heating.
- Don’t undercook or overcook:</-strong> Pull it at 234–236°F or after 4–5 minutes at a full boil. Too short makes soft fudge; too long makes it dry.
- Don’t add chocolate over heat: Remove the pan from the burner before stirring in chips to avoid seizing.
- Don’t rush the set: Cutting too early creates smudgy edges and a sticky texture. Let it firm properly.
Alternatives
- Chocolate choices: Try milk chocolate for a sweeter fudge or dark chocolate (60–70% cacao) for a richer, less sweet version.You can also do half semisweet, half milk.
- No nuts: Skip the walnuts if you prefer smooth fudge. For a nut twist, use pecans, almonds, or even pistachios.
- Flavor boosts:</-strong> Add 1/2 teaspoon almond extract, peppermint extract, or orange zest with the vanilla for a different vibe.
- Swirl-ins: After spreading, swirl in a few tablespoons of peanut butter, caramel sauce, or raspberry jam with a butter knife.
- Toppings: Sprinkle flaky sea salt, mini marshmallows, or crushed peppermint on top before it sets.
FAQ
Can I make this without a candy thermometer?
Yes. Start timing once the mixture reaches a full rolling boil and cook for 4–5 minutes while stirring constantly.
Watch for a thicker, glossy texture before removing from heat.
Why is my fudge grainy?
Graininess comes from sugar crystallizing. To prevent this, stir continuously while boiling, avoid scraping the sides of the pan into the fudge after it’s cooked, and make sure the chocolate and marshmallow creme fully melt.
Can I use margarine instead of butter?
You can, but unsalted butter gives the best flavor and texture. Margarine may make the fudge softer and less rich.
How do I fix fudge that didn’t set?
If it’s too soft, you can re-melt it gently with a tablespoon or two of evaporated milk, bring it back to a boil, and cook to 234–236°F.
Stir in fresh marshmallow creme if needed and reset.
Is marshmallow creme the same as marshmallows?
Not exactly. Marshmallow creme is smooth and spreadable, which melts evenly into the fudge. Mini marshmallows can work in a pinch, but creme gives more reliable results.
Can I halve the recipe?
Yes.
Use an 8×8 or 9×9-inch pan for a half batch. Keep the same cooking steps and timing.
How do I get clean slices?
Let the fudge set completely, then use a sharp knife. Wipe the blade with a warm, damp cloth between cuts for crisp edges.
What’s the best way to gift it?
Cut into small squares, place in mini candy cups or parchment liners, and pack in a tin or box.
Add a layer of parchment between stacks to prevent sticking.
In Conclusion
Original Fantasy Fudge is a tried-and-true classic for a reason. It’s easy to make, wonderfully creamy, and endlessly adaptable. With a few simple steps and steady stirring, you’ll have a pan of chocolate bliss ready to share—or keep.
Make it once, and it’s likely to become a tradition.