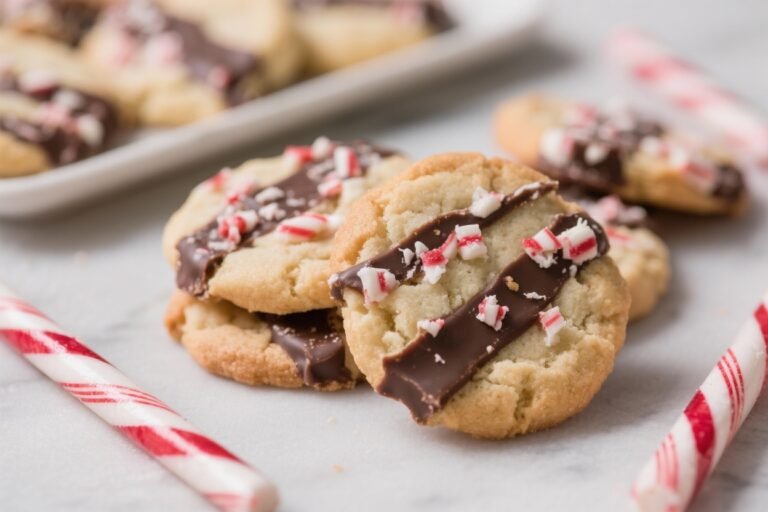
Beautiful Valentine Cookies Decorated Simply
Valentine’s Day sneaks up, and suddenly you want something sweet, cute, and totally giftable. Enter: decorated Valentine cookies. They look fancy, taste amazing, and scream “I put thought into this” without requiring a culinary degree.
Whether you bake from scratch or dress up store-bought dough, you can create cookie magic with a few smart moves.
Why Valentine Cookies Win Every Time

You can personalize them for literally anyone: partners, friends, coworkers, kids, your mail carrier—no judgment. Cookies feel special but not serious, which takes the pressure off the day. Plus, they travel well, last a few days, and double as edible décor. Win-win.
You also control everything: flavor, shape, color scheme, vibe. Cute pastel hearts? Bold red roses?
Sassy “be mine-ish” messages? Cookies turn into mini canvases. And yes, you can absolutely pull this off at home.
Start with the Right Cookie Base
You want something sturdy with clean edges. That means roll-out dough that doesn’t spread much.
- Classic vanilla sugar cookies: The gold standard.
Crisp edges, clean flavor, perfect for royal icing.
- Chocolate sugar cookies: Deep cocoa flavor that pairs beautifully with pink icing.
- Shortbread: Buttery, tender, and super stable. Great for simpler designs or chocolate dips.
Pro Tips for Sharp Shapes
- Chill the dough before rolling, and again after cutting shapes. Cold dough equals crisp edges.
- Roll to an even thickness (about 1/4 inch). Too thin cracks; too thick puffs.
- Bake on parchment or silicone mats to prevent spread.

Royal Icing vs.
Buttercream: Choose Your Fighter
Both look pretty, but they act differently. Royal icing dries hard for smooth, glossy finishes and sharp detail—perfect if you want that cookie-store look. Buttercream tastes richer and pipes like a dream, but it smudges easier and doesn’t stack well.
Royal Icing Basics (Without Tears)
- Consistency matters: Use thick icing for outlining and detailing; thinner icing for flooding.
- Color in small batches. Gel food colors give vibrant shades without thinning.
- Use squeeze bottles or piping bags with small tips (like #2 or #3) for control.
Buttercream Tips for Soft, Dreamy Designs
- Use American buttercream for stability, Swiss meringue for that whipped, not-too-sweet vibe.
- Chill finished trays if you plan to transport them.
Buttercream softens fast.
- Go for piped rosettes, ruffles, and drops. They look fancy with zero art school.
Design Ideas That Deliver (Without a Fine Arts Degree)
You don’t need to reinvent the heart-shaped wheel. Keep it simple, then layer details.
- Conversation hearts: Flood pastel bases, then pipe tiny messages: “XOXO,” “Be Mine,” “ILYSM.” Cute and classic.
- Minimalist hearts: White flood, thin red outline, tiny off-center heart.
Chic and easy.
- Plaid or gingham: Flood and dry. Paint or pipe thin lines in layers for that preppy look.
- Abstract swirls: Drop dots of contrasting icing on wet flood, then drag a toothpick. Instant marbling.
- Chocolate-dipped shortbread: Dip diagonally in dark or ruby chocolate.
Add sprinkles or crushed freeze-dried berries.
Texture and Sprinkle Strategy
- Use nonpareils and jimmies on wet icing. Add metallic dragees after icing sets slightly.
- Crushed freeze-dried raspberries add color, flavor, and a grown-up vibe.
- Edible glitter? Sparingly.
You’re going for elegant, not disco-ball disaster.
Color Palettes That Don’t Scream “Candy Store”
Classic red and pink works, but let’s expand. Choose three colors max so things look cohesive, not chaotic.
- Soft romance: Blush pink, dusty rose, warm ivory.
- Modern bold: Chili red, hot pink, matte black outline for contrast.
- Berry tones: Raspberry, plum, cranberry with white details.
- Chocolate chic: Cocoa brown, cream, gold accents.
FYI on Coloring Icing
- Colors deepen as icing dries. Stop a shade early.
- Use gel colors to avoid thinning.
A toothpick dab goes a long way.
- For black or red, tint a day ahead. The color develops, and your sanity stays intact.
Step-by-Step Decorating Flow
Let’s make this painless. Here’s the workflow I use when I’m not pretending to be a pastry chef on TV.
- Bake and cool: Completely cool cookies.
Warm cookies melt icing—ask me how I know.
- Outline: Pipe a thin outline with thicker royal icing. This is your barrier.
- Flood: Fill with thinner icing and nudge to the edges with a scribe or toothpick.
- Set: Let the base dry for 30-60 minutes before adding details. Full dry takes 6-8 hours or overnight.
- Detail: Add lettering, dots, lace, or borders.
Sprinkle while still tacky if needed.
- Finish: Dry completely before stacking or packaging.
Common Fixes (Because Things Happen)
- Air bubbles: Pop with a toothpick right after flooding.
- Cratered dots: Use slightly thicker icing for small shapes and let the base dry first.
- Bleeding colors: Avoid over-saturating dark colors; dry between layers.
Make It Personal: Messages and Themes
Want your cookies to feel custom? Add inside jokes, initials, or dates. Short phrases work best and look cleaner.
- “You’re cute” (factual)
- “Still my favorite” (romantic without cheese overload)
- “Pizza > Flowers” (IMO, relatable)
- Monograms or nicknames
Lettering Without Tears
- Write with a slightly thicker icing consistency so it holds shape.
- Practice on parchment first.
Your hand loosens up fast.
- Use simple block letters or all-caps for easier readability.
Packaging, Gifting, and Storing
Don’t let your gorgeous cookies suffer in transit. Presentation sells the enchantment.
- Bag individually in cellophane with ribbon. Add a tag for that boutique feel.
- Box by size: Small boxes for sets of 2-4; bakery boxes for dozen sets with tissue paper padding.
- Storage: Keep in an airtight container at room temp for 3-5 days. Freeze undecorated cookies if prepping ahead.
- Separate buttercream cookies with parchment if you must stack.
They smush, so be gentle.
Allergen and Diet-Friendly Swaps
- Gluten-free roll-out dough works well—look for blends with xanthan gum.
- Dairy-free butter alternatives bake fine; choose ones labeled for baking.
- Vegan royal icing with aquafaba (chickpea liquid) whips up beautifully.
FAQ
How far in advance can I make decorated Valentine cookies?
Bake and decorate up to 3 days before gifting, and store airtight at room temp. For longer timelines, bake the cookies, freeze them undecorated for up to a month, then thaw and decorate 24 hours before you need them. Royal icing-decorated cookies hold better than buttercream.
What’s the easiest beginner design that still looks impressive?
Flooded hearts with a marbled swirl.
Flood the base in pink, add dots of white while wet, and drag a toothpick through the dots. You’ll get gorgeous patterns with almost no precision required—IMO, the best beginner win.
How do I prevent royal icing from drying out while I work?
Keep a piece of plastic wrap pressed directly on the surface of the icing bowl, and cover piping bags with a damp paper towel when not in use. Royal icing crusts fast, so treat it like a toddler with markers—never leave it unattended.
Can I use store-bought dough and still get clean shapes?
Yes, but pick a dough meant for cut-outs, not drop cookies.
If it spreads, knead in a tablespoon or two of flour and chill thoroughly before rolling. It won’t be perfect, but it’ll pass the Instagram test, FYI.
Why do my colors bleed into each other?
Over-saturated gel colors, too-wet icing, or stacking before fully dry cause bleeding. Use less dye, let layers dry between colors, and give decorated cookies a full overnight dry before packaging.
Humidity also matters—use a fan or dehydrator on low to help set.
Do I need special tools to start?
Not really. A rolling pin, cookie cutters, parchment, a couple piping bags or squeeze bottles, toothpicks, and food coloring will do the job. Grab a scribe tool and a few piping tips later if you catch the decorating bug (you probably will).
Conclusion
Decorated Valentine cookies hit the sweet spot between heartfelt and doable.
With a sturdy dough, a smart icing plan, and a few playful designs, you’ll turn out a batch that looks boutique-made and tastes homemade. Keep it simple, have fun, and don’t sweat tiny imperfections—they make your cookies look human, which, IMO, is exactly the point of Valentine’s Day anyway.